Subscribe
calibration.jpg
Home Recording

How To Calibrate Your Control Room

In 2017, Team Headliner opened its first mixing space, uniquely located above a 600-year-old inn in rural St. Albans. Since then, much fun has been had, products have been tested, artists have visited (and revisited), and music has been made. A few weeks ago, we upped the ante, and invited our friends at Source Distribution down to educate us in the art of room calibration. In a nutshell: how can we make our space even better?

Mixing music can be quite an art - and although there are no real rules when it comes to what kit you should use, how you should use it, and how it should sound at the end, the key to getting the best out of what you have is so often in the room you’re working in. We had that in mind when we built our first space last year - a small rectangular room, which we treated as well as we could using a series of GIK diffusers, bass traps, and various other acoustic panels.

It made a huge difference to the reflective place we once knew, and when we upgraded our monitoring system to a set of Genelec 8341s, we upped the ante further: much more accuracy, no fatigue at all after long sessions, and a very ‘mix as you go’ environment was suddenly created.

However, although the mixes were getting better and better, there were still a few issues to overcome at the mastering stage, and we couldn’t figure out why. What we hadn’t explored at this stage was room calibration, but the fact we had treated our room to a good standard before venturing into this world we knew would only be a good thing.

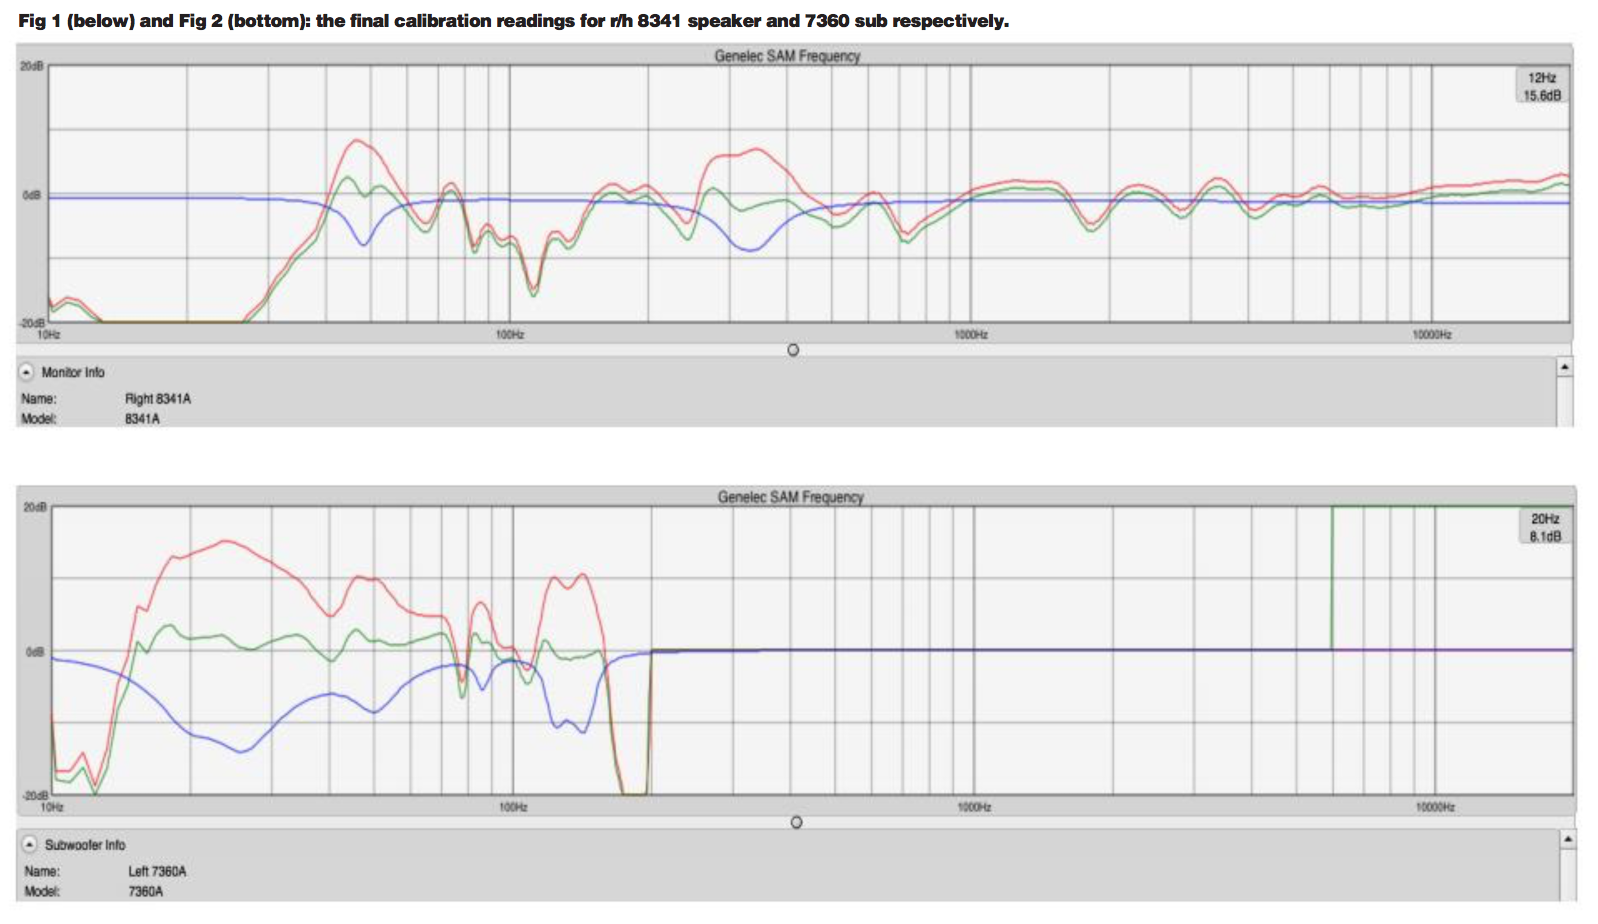
When Andy Bensley from Source Distribution arrives at our studio to do some audio tests, he informs us that he will be using Genelec’s AutoCal (Automated Calibration) system, which works with all of the manufacturer’s SAM (Smart Active Monitor) loudspeakers and subwoofers.

To make this happen, he pulls up the GLM (Genelec Loudspeaker Management) software on his laptop. Still with us? Good!

To minimise the tech talk here, as it can be a little bewildering, we ask Bensley to walk us through the process as we go.

“Essentially, you lay the speakers out onto the grid, as you would see them,” he explains. “The software doesn’t know the dimensions of the room, but it gives the software the location of the serial numbers, so it can see the speakers.”

SAM can network up to 30 speakers, so if we were measuring a big Dolby Atmos, or large surround system, it’s also an easy way to access the correct speakers.

“It’s very straightforward in terms of the way it all connects together, and guides you along, but it’s a very powerful tool,” Bensley says. “You put the serial number in to marry it up with the calibration file, so the inverse of the file marries up with the frequency response of the mic - so you have a flat mic. Without a calibration mic, you’re shooting in the dark a little bit.”

Bensley asks if we work mainly with the door shut. We do, so he closes the door, and turns off the fan.
“I’m ideally aiming for 60 degrees – 30 and 30,” he says. “The great thing about this space is there is a direct line of sight between yourself and the speakers.”

When we solve one area, we may solve something else further up – it’s a gentle process.

“We’ll get desktop reflections, but on the whole, we’re in good shape,” Bensley says.
Two high pitched noises follow - almost a ‘boing’ sound - and the software starts to work its way through the optimisation process. It will, he says, give us three readings.

“[looks at results] OK, so that is super-typical of lots of spaces, and a room of this size; one of things we talk about, which not many other manufacturers do, is this quarter wavelength cancellation,” he explains. We study the readings. “You have a dip between 80Hz and 120Hz, and that is pretty much the proximity of the speakers to the back wall - and you see this all the time.”

Bensley wonders if we could either bring the wall forward, or push the speakers closer to the wall, so the cancellation is moved further and further up - the idea being, if they’re right against the wall, we’ll just get direct sound, and the more of that, the better.

“However, it is a hugely musical area,” he ponders. “Snare, drums, low-end of male vocals, cellos, that kind of thing really does live in there,”

I tell Bensley that occasionally at mastering stage, I’m lacking a little body in my male vocals, despite the fact that there seems to be plenty of it in the room.

“It might be that if you’re not hearing it, you’re putting more of that energy in, so we might have to pull it out,” he says. “If you’re saying some of your male vocals lack some body, this area here - 200-250Hz - that is generally the meat of a male vocal, and we see this all the time in post-production: you see this hump because of desktop reflections. What people tend to do is EQ it out, but you end up with thin dialogue, so if that’s being put back in during mastering, it makes sense.”

The low end response is really good, Bensley declares; apparently, in spaces such as ours, there is generally a 10-12dB boost. Ours is at 8dB, so we’re in better shape.

At this point, we have swept the system left to right, derived directly from the speaker, and we have three readings. Bensley is now tweaking to improve where he can.

“The red line is the room response, and due to amount of room treatment, it’s fairly controlled; now it’s the reflections from the desktop - around 250Hz. This moderate bump in the low end isn’t ridiculous, and because of what I’ve taken out here, I will introduce some of that back in, to try and mask some of that,” Bensley says. “This is going back to the old school way of calibration. The issue you can get, though, is a big lording in the low end or the lower mid range that masks a lot of information in terms of reverbs and stereo imaging. So when you pull this energy out, suddenly you’re revealing what’s going on further up - all the additional harmonics.

“So when we solve one area, we may solve something else further up – it’s a gentle process. We may add something around the 250Hz mark, and then we’ll end up putting in a little high shelf - or a house curve, as the live guys would say - so you’re still experiencing some of the low end at a low level without having to crank the system.”

Bensley makes said tweaks, and we pull up Spotify to listen to his go-to reference music. He pulls down the volume of the calibrated version a dB or two for a true reference between the two.
“It’s just so you get a bit more of an objective view of what the calibration is doing: less smoke and mirrors. Anything that feels louder, and has more bass, is going to be instantly more appealing. So it’s fine for A&R playback, but if you’re looking for reference in terms of accuracy, then this approach is slightly better,” he explains.

It’s important to realise that sometimes flat isn’t musical; you need to be excited, enthused, and inspired by listening and mixing music.

As we listen back, the calibrated version is way smoother in the lower end. I also notice the low end rumble at the back of the room that was always prevalent has virtually disappeared.

“Your audio memory is super short,” Bensley reminds me. “So although it’s difficult to back this up, what I go for is ‘how firm is it?’ - that’s much more tangible than ‘sounds nice’. So when I hear a track in a control room, am I moved? Is it larger than life? Is the vocal solid? Does it feel real, distant, forward, substantial? Those cues are important.”

Now Bensley creates a third group of readings, which he names cal-mod (modified calibration) He notices that because we have taken some of that low end out, we are now really bright in the high end:

“It’s important to realise that sometimes flat isn’t musical; in post, you might want to hear every pop, gasp, and nuance, but you need to be excited, enthused, and inspired by listening and mixing music, so we might split the difference with the bass: maybe pop a dB or two back in. You want some energy to live in there.”

He nudges a little in, and concludes that it sounds better right away. Just a suggestion of having it back in there - not to the extent we had before - does seem to really work.

“The other thing that is huge is the offset in terms of level between the speakers – it’ll have a huge effect on stereo imaging, how firm that phantom centre is – and currently, it’s down one dB on the right side,” he says. This makes immediate sense, as stereo imaging has caused us a few issues in some of our mixes. “We will listen back, and kind of drag it in, then we’ll see where the vocal sits.”

The changes Bensley has made have really transformed the space. However, he still feels it can be better, and that a subwoofer might be the cure. He returns with a Genelec 7360 sub - and here is what he concludes:

“Overall, both speakers show a relatively flat frequency response after the AutoCal correction. The two main areas where correction was applied is at 45Hz and 317Hz on the left speaker, and 47Hz and 326Hz on the right. This is encouraging, as it shows that the room has a good level of symmetry. AutoCal was easily able to attenuate these peaks.

“Unfortunately, due to quarter wavelength cancelation because of the distance behind the monitors, we are seeing a severe cancelation in the lower mids between 65Hz and 120Hz. This is having a detrimental effect on the impact and coherency on snare hits, and overall, the system feels slightly soft.

“One solution is to move the speakers and desk towards the back wall, however, due to the lack of space on the rear wall, this may not be possible without removing and repositioning some of the acoustic treatment.

“The easiest and most effective solution is to add a subwoofer to fill in the gaps in the frequency response, and provide a smooth transition from the lower mids down to the lows. In addition, the system will be full-range, and will reproduce frequencies from 20Hz up to 20KHz.

“I position the subwoofer under the desk slightly offset to the left hand side.With the subwoofer installed and calibrated, we can see from the 7360 screen shot (see first image in article) that a relatively large amount of correction was required to produce a flat frequency response. The result was a remarkably consistent response without any significant cancellations.

“Initially, the crossover point was set to 100Hz, in order to replace the lack of lower mids in the left and right response. However, I felt that due to the relatively high crossover frequency, we were able to localise the position of the subwoofer. By lowering the crossover to 90Hz, the 7360 provided a much more supportive role, and brought back the impact and coherency in the lower mids that was lacking before.

“I’ve then brought the 7360 slightly closer to the centre, and really anchored the sub, kick, and bass elements to the centre of the stereo image. Fortunately, the response of the sub remains balanced, and overall, has improved an already impressive system.”