Subscribe
Home Recording

How to De-Ess Vocals for Smooth, Pro-Sounding Productions

So you've heard of de-essing as a powerful mixing tool. But what is de-essing? And how can it improve your vocal recordings? In this article, you'll learn how to de-ess vocals and why it's important.

In most cases, vocal production is the most critical element in a good mix. It's the central part of the arrangement in every style of music (except instrumentals, obviously). It can literally make or break a recording. And it can take a song immediately to the next level.

There are a lot of tools engineers and producers have at their disposal to sculpt the sound. Processors like EQ, compression, and saturation all play a part in the production process.

De-essing can seem confusing if you're new to music production, but in a nutshell, it helps to reduce or eliminate sibilance from your recordings.

What is Sibilance?

If left unchecked, sibilance can be super-annoying. Sibilance is the "s" sound that slithers its way into so many mixes. It also includes "F, X, CH, and SH" sounds.

It's an issue that many microphones can unfortunately emphasise. This is especially true for lower-end microphones. The good news is, you can mitigate the problem using purpose-designed de-essing plugins.

Sadly, fundamental mixing techniques, such as how to effectively compress vocals, how to apply EQ on a vocal track, or de-essing are often overlooked as home studio engineers become fixated with effects. Some call this "shinny toy syndrome".

Why Use a De-esser?

It's mainly used for vocal production, but it's also great for taming overly bright guitars and drum cymbals.

Certain equalization moves, compression settings, and saturators can worsen sibilance or introduce it if they're set incorrectly.

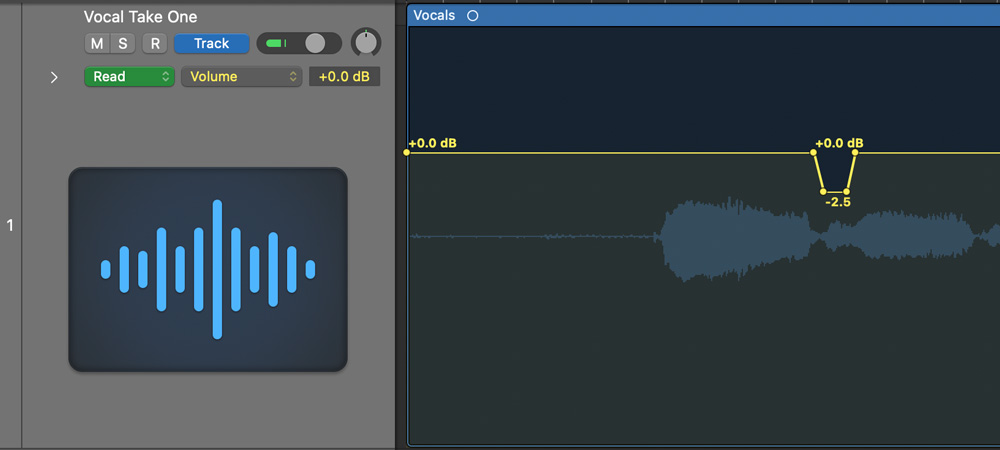
Using a de-esser, you can single out the frequency where sibilance exists and attenuate it so it doesn't sound harsh or distracting. Applied correctly, it can also prevent sibilance from adversely affecting other processes further down the signal chain.

When done correctly, de-essing will give you an even vocal sound that is consistent in tone and volume. But if you take it too far, it will make your sibilants too quiet or make them disappear altogether.

The irony is that sometimes it's not immediately certain that you need to de-ess. But when you overdo it, it's very obvious that you need to back it off a bit or switch up your settings.

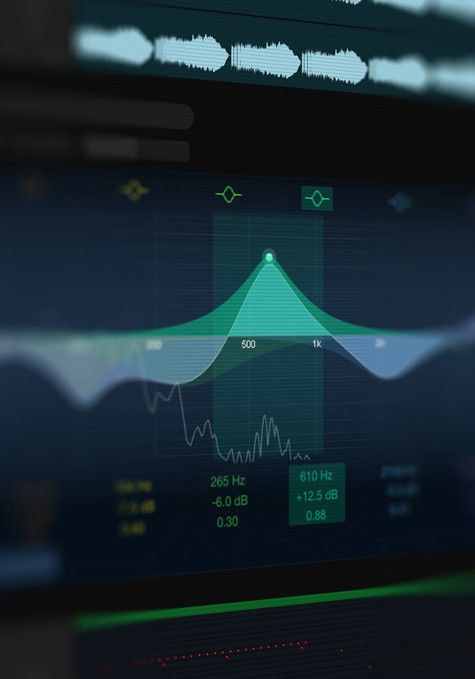
How a De-Esser Works

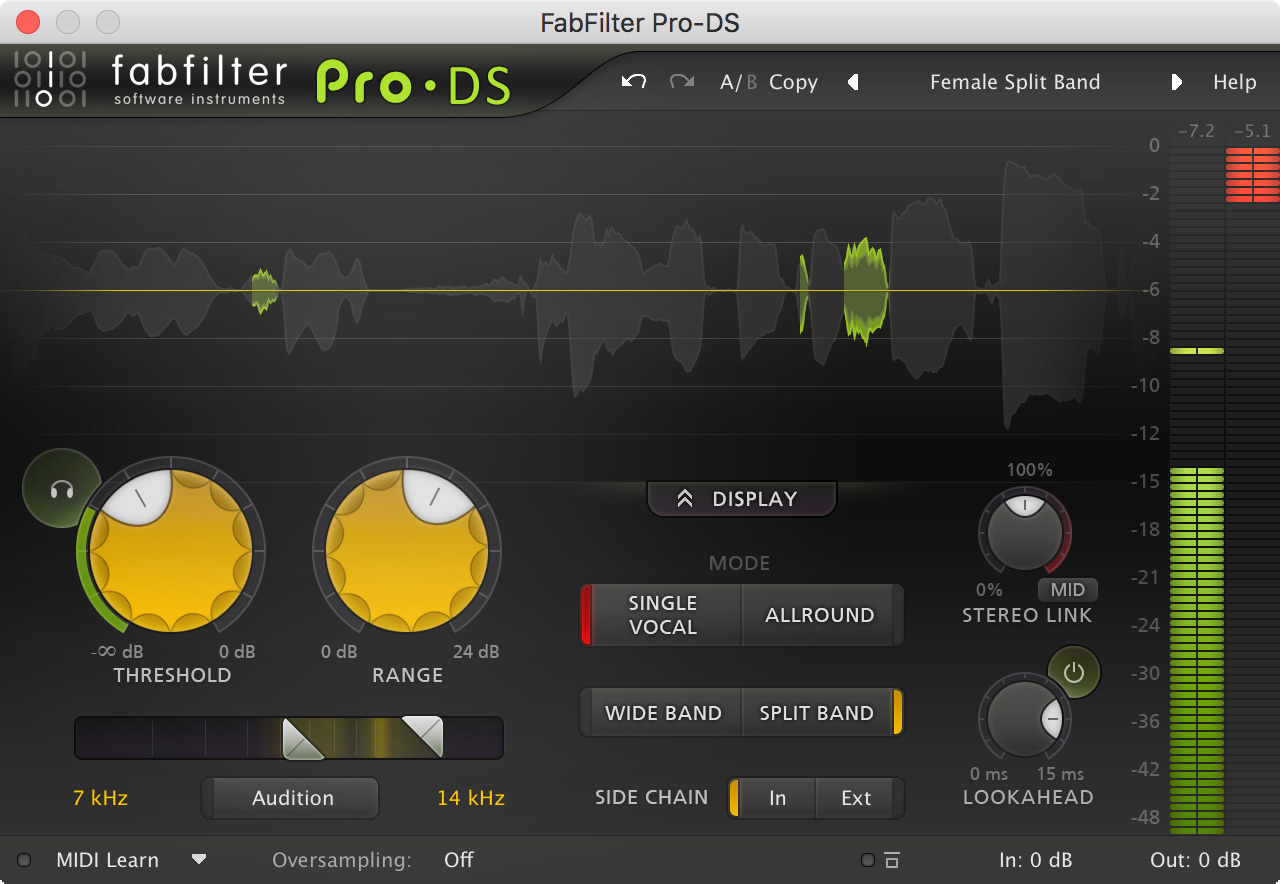
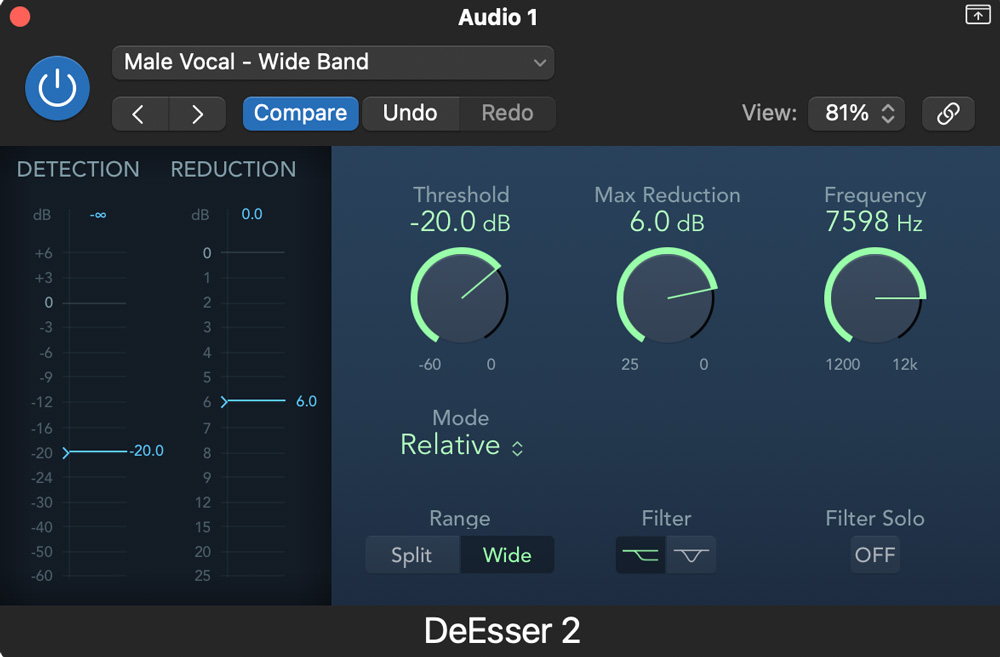
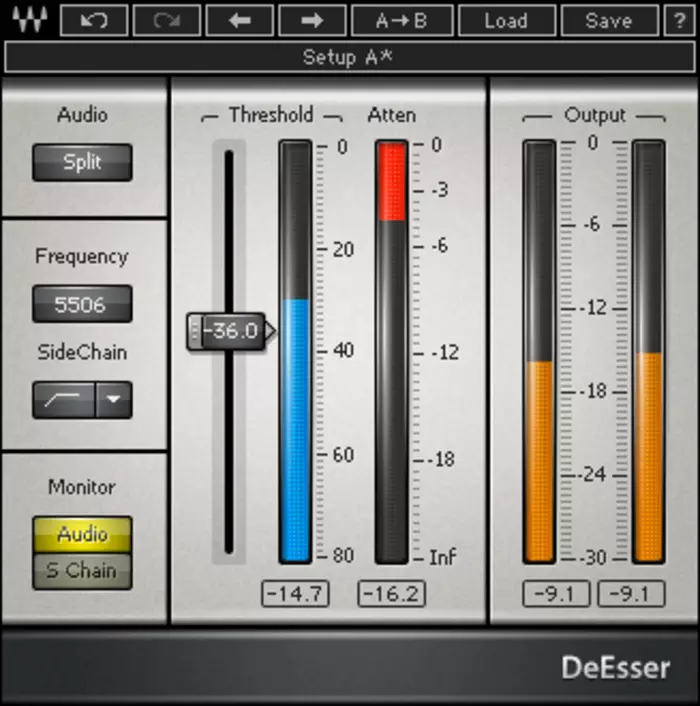
Think of it like a frequency-based compressor. Generally, they work under the same principles. Some de-essers offer more control options, but for the most part, the big three are threshold, range, and frequency.

Today, we'll explore the fundamental techniques and controls to help you get started.

De-esser Settings for Vocals

It might seem a little daunting at first, but setting up a de-esser is pretty simple; this is especially true if you've already mastered compression for vocals.

There isn't a one-size-fits-all approach to dialing in a de-esser, as the extent to which a de-esser is required depends greatly on the vocal style, the recording quality and even the lyrics.

1. Choose Your Problem Frequency Area

A good starting point is to loop a section of your vocal performance where the sibilance is particularly noticeable.

As we've discovered so far, a de-esser works in a similar way to a compressor, but as we're only concerned with reducing problematic sibilance. A de-esser doesn't "listen" to all the frequencies in your recording.

Instead, it listens only to a small frequency band based on how we set up the plugins "sidechain filter". We must adjust this listening frequency for optimal performance.

You'll normally locate sibilance in a vocal around the 5 - 8KHz range, but it's important to note this can vary depending on the vocalist, their performance, and the recording quality.

Good de-essers have a "filter-solo" function that enables you to monitor just the selected frequency. This feature is handy for sweeping across the frequency range so you can listen to where it sounds the harshest. 

2. Threshold

Secondly, adjust the threshold. This parameter determines how loud the sibilance must be before the de-esser actually kicks in. The key here is to listen to your vocal in context and slowly adjust the threshold until the sibilance sounds tamed and the vocal sits naturally in the mix

3. Range

Not all, but many, de-essers feature a "range" control. This function essentially sets how strong the de-esser will react to the audio when the threshold is met.

Depending on your vocal, you'll have to experiment with this control, but it's easy to tell when the range is set too high because the vocal will introduce artifacts or sound "lispy".

4. Attack

Again, not all de-essers have a dedicated attack control, but just like on a compressor, this sets the speed of how fast it clamps down on the signal.

Split-Band vs. Wide-Band

If you're using a tried-and-true de-esser, mostly, they will give you two options – split-band or wide-band.

In wide-band mode, the de-esser turns down the entire signal. In other words, it turns down ALL frequencies equally.

In split-band mode, only a small portion of the frequency range around the problematic area is affected.

There are always exceptions, but in general, unless you're dealing with a very problematic vocal, wide-band mode is usually the best option for de-essing vocals as it will sound more transparent.

If you're not careful, split-band mode can result in a very unnatural coloured sound as a small portion of the high frequencies is reduced while the rest of the frequency spectrum remains untouched.

That said, split-band is useful for honing in on problematic areas, particularly when applying de-essing to instruments, such as overly fizzy guitars are harsh-sounding cymbals. Ultimately, trial both and listen to what sounds best.


Advanced De-Esser Controls

Some de-essers feature a few additional advanced controls; let's take a look at some of the most common extras:

Side-Chain Filter Types

Some de-essers, such as the examples from Logic and Waves, allow you to adjust the filter type on your side-chain filter (the listening frequency of our de-esser, if you remember).

As per below, you can select between high-pass or band-pass filters. Depending on the type of sibilance in your recording, one filter may help you hone in more on the bad stuff better than the other and aid you in achieving a more transparent sound in the process.

Lookahead

If your de-esser plugin sports a "lookahead" feature, you're in luck, as it's a really handy extra that can improve the performance. In a nutshell, "lookahead" monitors the signal a few milliseconds in advance, searching for sibilance before it happens. Again, it helps the compressor react quicker to sibilance, resulting in a more transparent result. 


Alternatives to De-Esser Plugins

De-esser plugins are by far the quickest and easiest way to control unwanted vocal sibilance.

That said, there are alternative methods that (under the right circumstances) can yield great results.

Consider Specialist Plugins

If your budget will allow it, it's worth exploring alternative plugins designed to tackle harsh frequencies in a recording. One such example is Oeksound soothe2.

soothe2 is a superbly clever dynamic resonance suppressor. It quickly and elegantly removes harshness and was originally designed to mitigate sibilance in problematic vocal recordings. The plugin's algorithm sounds very transparent compared to many remedial EQ methods.

Automation to Reduce Sibilance

One alternative method is simply to identify where the sibilance is and use automation to reduce the audio signal at these points. If your vocal has a lot of sibilant parts, this can prove to be a little tedious. However, as all compression types colour the sound to a degree, simply reducing the volume using automation is the most transparent way to control sibilance.

Adjust Your Microphone Technique

One of the best ways to avoid pesky sibilance is to avoid capturing too much of it in the first place. You can do this by firstly reconsidering your vocal microphone if you find it tends to emphasise sibilance easily.

Or, if a new mic is out of the question, try changing your mic technique. Twisting the mic position slightly off-axis, or singing just above the mic capsule (rather than directly into the centre) can help round off some of the harsh higher frequencies.

Another popular hack is the so-called "pencil trick". You're going to have to follow me on this one. But this is a very cool recording hack that doesn't require any extra gear. All you have to do is tape something like a pencil to the pop filter. That's it! What this does is split the stream of air coming from the vocalist's mouth as it hits the diaphragm of the mic.

It's not necessarily a replacement for using a de-esser and might not reduce it altogether, but it's a fast and simple trick that…actually works. 


Conclusion

When applied discreetly, de-essing is a vital tool that works well to reduce a common issue when recording vocals.

As with all recording practice, it pays dividends to get the best possible recording on the way in rather than relying too heavily on "fix it in the mix" techniques.

The better your mic technique (and, to a degree, the quality of your microphone), the less de-essing you will have to apply.

Every case is different, every vocal performance unique. Your job as the engineer is to identify when and how much of these processes are required to create a polished, professional mix.