Subscribe
Home Recording

How to EQ Vocals Professionally - A Beginner's Guide to Pro Results

Understanding how to EQ vocals is part art, part science. Every recording is different and it's important to use your ears and apply a degree of interpretation with every vocal you mix.

Saying that, there are a few solid foundations and mixing principles you can apply broadly to the majority of your recordings.

In the following guide, we'll lay down a step-by-step guide on how to EQ vocals so you can make an informed choice about the best way to apply settings to enrich and enhance any vocal performance.

First Things First - Focus on the Initial Recording

Fixing a bad recording is very tough work. So while we can apply remedial EQ approaches to mitigate the problems associated with poor acoustics or lousy microphone technique, the results are invariably better when (as engineers) we focus on capturing the initial recording as best possible.

The more attention you pay to room acoustics, microphone techniques, and gain structure on input, the easier it will be to apply EQ on your vocal in a way that compliments the overall track.

If you're not blessed with a perfect recording environment like many home studio owners, there are techniques you can apply to "DIY" a solution. Follow our complete guide on how to record vocals for more help in this area.

How to EQ Vocals Step One: Apply Initial Parametric EQ

Like any mixing process, the order in which you apply plugins within your DAW will make a huge difference to the result.

Assuming you will apply some degree of compression to the vocal, it's good practice to apply EQ to your recording before and after compression. See our guide on how to compress vocals for more information here.

For the purpose of this tutorial, we'll be using Logic Pro, but all other professional DAWs will have their own equivalent of a Parametric EQ.

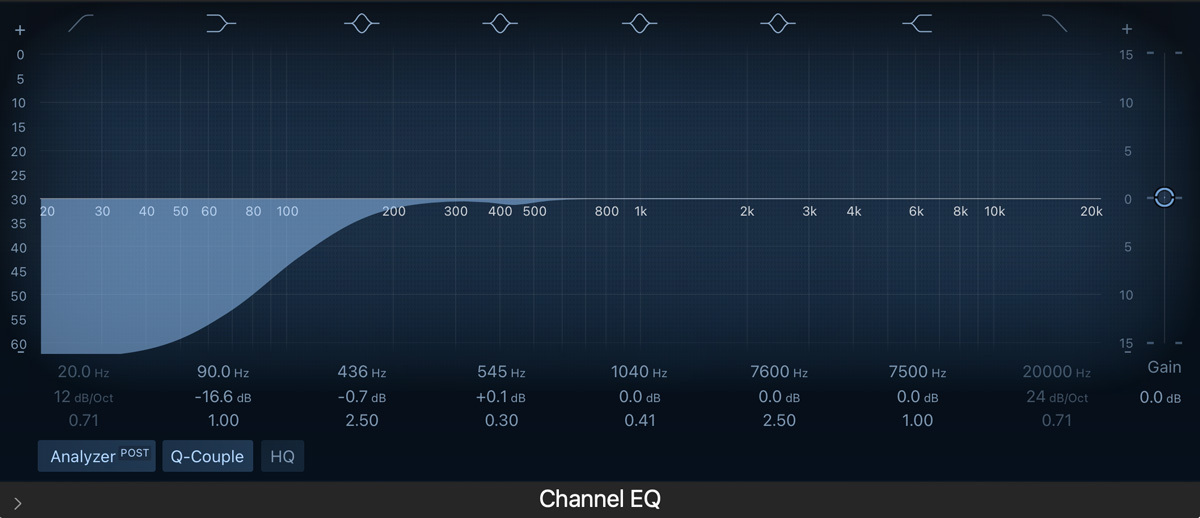
We're going to start by applying a Parametric EQ in the signal chain before adding a compressor. At this stage, we are going to use the EQ to remove any excessive low-frequency energy and control any other over-zealous areas that will make our compressor work harder than necessary.

This usually involves applying a low-frequency roll-off from around the 90Hz mark and applying a light cut to the low-mids where we could have some energetic or boomy frequencies.

In the context of your overall mix, leaving the energetic low frequencies untouched will muddy up the mix and make it difficult for the instruments occupying this space to compete.

How to EQ Vocals Step Two: Applying EQ After Compression


If we did a good job of recording and applying compression, then applying EQ at this stage should be more about subtle shaping than fixing any glaring issues.

Where exactly you choose to reduce or accentuate frequencies can vary from one recording or performance to another, but the following is a starting point or guide to some of the most common approaches.

Further Controlling Muddy Vocals

Depending on how things sound after compression, we might still want to reduce some of the boomy or boxy tones around 200 - 400Mhz. Broad, subtle cuts are best as we can start to affect the tone of the recording if we cut these too much.

As a rule of thumb, cutting or boosting frequencies more than 5-6dB can start to sound quite unnatural. Some EQs are more transparent sounding than others, of course. Check out our full guide on the best plugins for vocals to find out more.

Adding Presence for Clarity

Depending on the vocalist and style, a broad and subtle boost between 2-6KHz can help add presence and improve clarity.

Boosting in this area will help cut through a busy mix and make each word easier to hear.

That said (and this is why you should always trust your own ear and not blanketly apply settings based on any guide), consider cutting frequencies in this area if the performance sounds harsh or brittle.

In some cases, your mix might also benefit from a subtle boost in the mid-range. This can vary from one vocalist to another, but start around 1-2KHz if you feel the vocal needs more clarity in the mix.

Give The Vocal Some "Air"

Many vocal recordings benefit from opening up in the high frequencies (otherwise known as adding "air" or "shimmer" to the performance.

Subtlety is the key here. A very gentle high shelf from around 8KHz should do the trick, but generally (with a good recording), you should only need a small boost between 1-3dB here. Again, this greatly depends on the recording, content, and vocal style, and even your choice of microphone.

Best EQ Settings for Vocals


While this approach can work for many recordings, it's important to use your ears and not simply apply templated settings to all your recordings. Different voices and vocal styles will call for their own unique and individual approaches.

As a recap, for this particular example we applied the following settings:

EQ Before Compression:

  • Roll-off excessive low-frequency energy below 90Hz
  • Reduce mud in the low-mid frequencies (Usually between 250-500KHz)

(Then we applied compression)

EQ After Compression:

  • Reduce any boomy or box sounds in the low mids if necessary between 200-500KHz.
  • Boost presence for clarity - usually between 2-6K, depending on the vocalist.
  • Boost at the core mid frequencies (usually between 1-2K
  • Add some air if desired using a high-shelf from around 8KHz

Consider Apply A De-Esser to Reduce Sibilance

Depending on the vocal recording and microphone technique, you might want to add a de-esser into the signal chain.

Harsh sibilant 's' and 't' sounds can be a real irritant to the listener, but instead of trying to EQ them out, it makes more sense to control them using a de-esser.

A de-esser is essentially a fast-acting compressor that only compresses at a certain band of high frequencies. You can set the de-esser to suppress at a given frequency and only when the input signal crosses the set volume threshold at the problematic frequency.

You will often find these sibilant sounds somewhere between 5-10KHz. Set your EQ to a tight boost and sweep through the high frequencies until you locate the problem, and then set your de-esser accordingly.

Applying a de-esser first in the signal chain will avoid compressing the unwanted harsh frequencies, but for a very sibilant recording, you may need one after EQ and compression.

Changing your microphone technique can help reduce sibilance. So if you're finding this a problem, consider changing the microphone or adjusting the singer's position to be slightly off-axis. Singing very directly or closely to the mic can emphasise sibilance, so it pays to listen carefully and adjust accordingly.

How to EQ Vocals Professionally - Summing Up


Training your ear to apply EQ in a way that compliments your overall mix or production can take years to master.

With the basics outlined in this article, you've got a solid base from which to start. Listening within the context of a song is important, as what sounds good in isolation when you solo the vocal channel might not necessarily work with everything else.

For example, those lovely rich warm low-mid frequencies might add depth to a podcast vocal or a sparse song, but they could cloud the bass guitar or kick drum in a dense rock or pop track.

Context is everything, but having now followed this guide, you should better understand why you might cut certain frequencies or boost others.