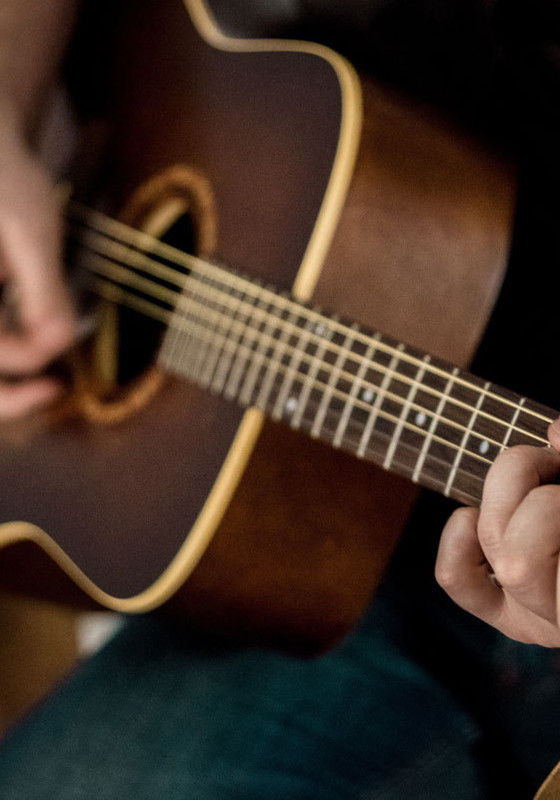

Recording acoustic guitar is an entirely different kettle of fish compared to recording electric guitar.
For a start, with electric guitars, we can often entirely avoid the use of microphones. The same is rarely true for acoustic guitars.
Modern amp modelling software has simplified the recording of electric guitars and made it possible to achieve high-quality results without touching a single microphone.
That said, there's still nothing quite like a great amp recorded with a superb mic to elevate the recording quality from ordinary to extraordinary.
Acoustic guitar modelling hasn't quite reached the same convincing level of realism. The sound they produce is wonderfully complex, and while electric guitars are about micing or modelling the amplifier, acoustic guitars are all about the instrument itself.
To help you achieve a great sound from the start, we've put together a simple to follow guide on how to record acoustic guitar at home or in the recording studio.
What Do I Need to Record Acoustic Guitar at Home?
On a very basic, you will need the following items to get started:
- A computer loaded with a DAW (digital audio workstation). In other words, multitrack recording software, such as Garage Band, Logic, Pro Tools, or Cubase to name just a few.
- An audio interface with one or two microphone preamps, plus a headphone output for monitoring the follow or click track during recording. You can get started with a good quality interface for less than you think - check out our full guide to the best budget audio interfaces for more information.
- At least one condenser microphone and a set of studio headphones for monitoring. Keep in mind, your click or follow track can leak from the headphones to your microphone, so consider keeping the volume low and investing in a set of headphones with good sound isolation.
- A good quality microphone stand with a boom arm. And, of course, an XLR cable to connect your mic to the audio interface.
First Things First: Make Sure your Acoustic Guitar Sounds Great
At risk of sounding like a broken record, a professional result always starts by getting the source right. If your acoustic guitar sounds great, the rest of the process (including the mix) becomes plain sailing.
As a bare minimum, change the strings on your instrument the night before your recording session, but in an ideal world, we also want to check the guitar for any intonation issues or poor action that could affect the performance.
If you suspect your guitar doesn't measure up, consider borrowing or renting a higher-end model for your recording session.
A solid wood guitar, or at the very least, a model with a solid top, will invariably sound better than a cheaper guitar made from plywood. The strings you choose can also impact the sound, from the material to the string gauge.
Phosphor bronze strings are the most common, producing a balanced, pleasing sound with a little more presence in the mid-range than traditional 80/20 bronze.
Lighter gauge strings (generally anything with an 11 gauge on the top E-string) are easier to play but also produce a thinner sound. From 12 gauge up, there is a balance to strike between playability and tone.
Room Acoustics - The Basic Foundations for Recording Success
The space you choose to record in has a big impact on sound quality when it comes to recording acoustic guitar. This can be a challenge for home studio owners, as normal household rooms rarely have desirable acoustics.
Bare and straight parallel walls or very small rooms with high ceilings are best avoided if you can. You want to strike a balance between taming reflections in the room and potentially making the room sound too 'dead'.
If you have the flexibility and budget, it's worth investing in some home-studio acoustic treatment. Companies such as Primacoustic and Auralex make pre-designed kits to suit a variety of different room sizes.
If that's not an option, you can hang soft materials such as duvets or introduce rugs to absorb some of the early reflections. Uneven surfaces, such as bookcases, make great natural sound defusers.
Microphone Technique For Recording Acoustic Guitars
As a general rule of thumb, a dynamic microphone will rarely do justice to an acoustic guitar. Stringed acoustic instruments are inherently rich in high frequencies. For this reason, selecting a good quality condenser microphone will invariably yield a more satisfactory outcome.
Small diaphragm condenser microphones have less inertia than large-diaphragm condenser mics, and therefore often capture a crisp, detailed acoustic guitar sound.
That said, large-diaphragm condenser microphones can pleasingly shape the recorded sound, so it's not a hard and fast rule by any means.
Polar Pattern: Omni-Directional vs. Cardioid
If you're lucky enough to have a home studio setup with ideal acoustics, an omnidirectional condenser microphone will produce a more natural and accurate representation of your acoustic guitar.
Most home studios don't have perfect acoustics, so in this case, you might find you get better results with a directional cardioid polar pattern.
Many good-quality (and these days, highly affordable studio microphones) have a selectable polar pattern response. Try switching between omnidirectional and cardioid; listen carefully to the result— specifically the balance between direct and reverberant sounds and any change in tone.
For most home studios, a cardioid pattern will help aid in the rejection of unwanted room reflections. The trade-off with a directional polar pattern is the colouration of sound, especially regarding the proximity effect.
We've covered the proximity effect before in our article explaining how to record electric guitars. In short, the proximity effect is a phenomenon in directional microphones whereby low-frequencies are boosted as the microphone gets closer to the sound source.
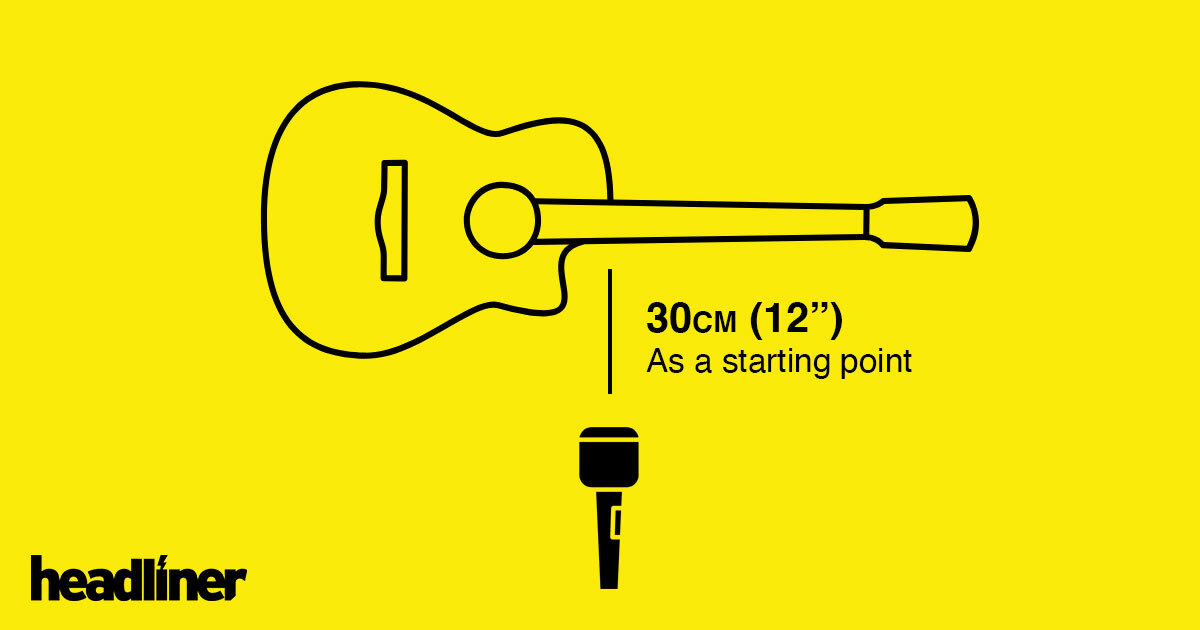
Recording an Acoustic Guitar Using Only One Mic
Depending on where you position the microphone, you'll get a drastically different tone. For example, if you choose to focus on the guitar body, the recording will sound warm and mellow. Place a mic above the shoulder of the guitarist and you'll capture what they hear when playing.
When using a single microphone, it makes sense to aim for a balanced sound capable of sitting nicely in a mix—nothing too bright and avoiding excessive boomy low frequencies.
You can achieve a balanced sound using a single microphone by placing it roughly 30 cm (just under 12") away from the guitar where the neck joins the body.
Small adjustments in position can result in a drastic tonal change. Move the mic closer to the soundhole to boost low frequencies. Avoid the soundhole directly, as this result in an unwieldy, boomy sound.
Recording Acoustic Guitar Using Two Microphones
Using two microphones to record the guitar (either in stereo or as a mono blend) opens up possibilities but requires some attention to detail.
You can achieve a greater sense of space and atmosphere (particularly when the guitar is a major part of the composition) when using two microphones panned for stereo effect.
In addition, recording the guitar with more than one microphone allows you to capture the bigger picture in terms of how the guitar sounds in a room, rather than honing in on one particular tonal element.
Put another way, you can blend the tonalities of a guitar's body, strings, soundhole and neck into one cohesive sound.
A microphone placed at the body will provide a warm and mellow sound, while an additional microphone pointed at the neck can then add additional brightness.
The challenge when using more than one microphone is ensuring each signal is in phase with the other. If the different signals are out of time with each other when mixed, it can result in phase problems.
One technique to minimise phase issues is to ensure both microphones are the same distance from the soundhole. This can help, but it's important to listen carefully using a set of headphones and make adjustments accordingly.
Another good rule of thumb is the 3:1 microphone placement rule. The rule states the distance between two mics should be at least three times the distance between each mic and the guitar.
For example, if mic A is 15cm (roughly 6") from the 12th fret, mic B should be at least 45 cm (18") away from mic A. This approach will help keep phase cancellations to a minimum.
To improve things further, many plugin suites come equipped with phase alignment plugins to help improve phase relationships between tracks during the mix stage in your DAW (digital audio workstation).
Stereo Microphone Technique for Acoustic Guitar
If you choose to go down the stereo route by panning two microphone signals, this can add width to a sparse composition. However, keep in mind that it will also make the location of your guitar in the stereo image less resolute.
The most popular stereo mic techniques include AB, XY, and ORTF:
AB (Spaced Pair) Stereo Method
Also called a spaced pair, the AB technique is where two stereo microphones are placed apart to create a stereo imaging effect.
XY Stereo Method
For the X-Y method, we take two identical cardioid microphones and face them away from each other at a 90-degree angle. The stereo image is not as wide as a spaced AB pair, but this technique is perfect for minimising phase cancellation. This is because the sound arrives at each capsule simultaneously due to the close proximity.
ORTF Stereo Microphone Technique
ORTF takes its name from the French TV station that first contrived the approach. It's a clever idea in that it's designed to mimic how the human ear receives sound.
You will need two identical cardioid microphones. Place them 17 cm (6.2") apart and facing away from each other at a 110-degree angle. The result should be as close as we can get to emulating the width and directionality of the human listening experience.

Which Microphone Technique Is Right for You?
Whether or not you choose a single microphone technique or two microphones (either blended or panned for stereo effect) will depend on your music and a degree of personal taste.
As a general rule, it's easier to fit an acoustic into a busy mix using just one microphone. For the majority of popular music, this is are far as you need to go.
To make a feature of the guitar—or achieve greater stereo width when recording sparse or stripped-down music styles—dual-microphone techniques come into their own.