Step One: A Great Drum Recording Requires A Superb Drummer and Kit
There's no use recording your own drums if the drummer or the drum kit isn't up to scratch.
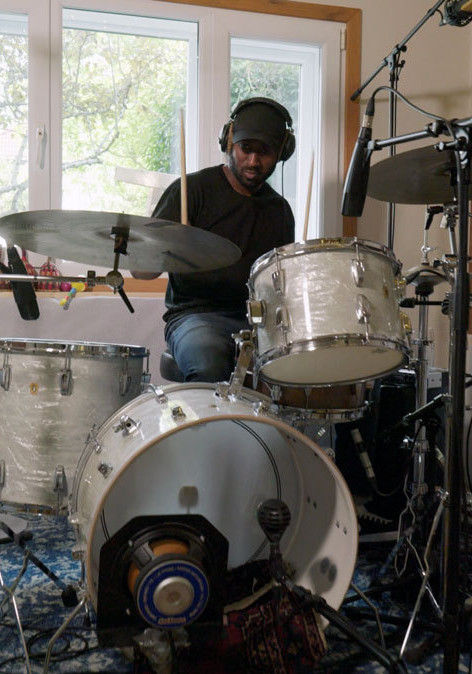
For the example in this feature, we head down to Julian's studio in Nonsuch Park, South West London.
At the studio, we also meet with session and touring drummer, Samson Jatto, an extremely versatile player with particular strengths in delivering strong articulation and funky, solid grooves.
A great drummer like Samson will know how to tune a drum kit to sound its best ahead of the recording session. It's also advisable to replace the drum heads ahead of time to ensure the kit will sound and play its best.
Step Two: Microphone Technique for Recording Drums
Julian shares a common bread and butter approach he regularly uses on countless recordings to achieve a solid drum sound reflective of Samson's articulate drum style.
Overheads:
Julian chooses a classic pair of AKG 414s placed equidistant to the snare drum for the overhead mics. This will capture the essence of our overall drum sound and provide a nice stereo image of the kit while being mindful of phase relationships between each mic and the snare drum.
Once we're happy with the position and sound of the overhead mics we can move on to the other spot mics across the kit.
The most important consideration when recording any instrument with multiple microphones is phase relationships between each microphone. The more microphones we introduce, the more complex this becomes and the more phase issues we'll encounter.
As Julian rightly states in our video overview, the best course of action when it comes to phase issues is to know what you're listening for and make minor adjustments until you achieve the best possible sound.
Use a good pair of studio headphones and listen for issues such as comb filtering, hollowing out, or a thinning of the sound.
Comb filtering occurs when two or more identical audio signals are mixed together with a slight delay. The resulting frequency graph of these signals looks like a comb (hence the name).
Listen out for a flanging sound or a robotic sound effect as a result of frequency cancellation caused by comb filtering.
Another key aspect to listen for is a complete loss of the kick drum low-end around 60-50Hz. If this is the case when using multiple microphones together, then you need to revisit the mic positioning to improve phase relationships.
Listen carefully to the relationship between each microphone while making small adjustments. You can also use phase-inversion switches on your preamp or mixer if you have one, but remember that's a 180 degree flip in phase. In some cases this will improve the sound, but in many instances, all you need to do is move the microphone and listen carefully.
Effect Overhead
In our example, Julian includes an effect overhead in the centre, which sometimes he will use further away as an effect mic.
For example, in some sessions, he might use this mic further away to capture more room ambience for a 'John Bonham style' bigger drum sound (à la When The Levee Breaks, for example).
In this session, however, Julian uses this mic over the kit to capture an overall picture of the sound in mono. He then exaggerates compression on the mic for effect. When a channel like this is used with heavy compression and blended in, it can add character to the overall mix.
Depending on what the song demands, he might also leave this channel out altogether.
Kick Drum
The direct mic here is an AKG D112 which is a great mic for capturing the direct thump and attack of the kick. Julian places this microphone directly inside the kick drum pointing at the front drum head.
Accompanying the D112 is a custom speaker arrangement designed to pick up the lower sub frequencies of the kick drum. These arrangements are often described as a 'sub-kick' microphone. They essentially consist of a speaker setup in reverse, which acts like a very large diaphragm dynamic mic.
As a combo, it's a common approach these days for capturing deep bass and the general character and punch of a kick drum that can be difficult to achieve with a single microphone.
Naturally, when two microphones are used on the same source, you'll want to listen carefully for any phase relationship issue. If the phase is out, you'll likely lose the benefit of your sub-kick entirely.
Toms
A classic choice from Julian here is the Sennheiser 421. When starting out, many engineers make the mistake of placing tom and snare mics too close in an attempt to improve the signal-to-noise ratio and sound isolation between each channel.
Most often, you'll find backing off the drum head will allow the attack and resonance of your toms to breathe, which results in a more natural sound and a better impression of the overall drum's tone.
If you can achieve solid-phase relationships between each mic on the kit, bleed and spill between each channel becomes much less of a concern in the first place.
Hi-Hat
Capturing the crisp high-frequencies and transients of the hi-hat is a Neumann KM184 (a small diaphragm condenser mic ideal for this application).
Julian positions the mic just off the hi-hat allowing Samson room to articulate variation in his drumming style.
Snare
On top of the snare is a classic Shure SM57 (a regular go-to mic for capturing the top-side attack and tone of a snare sound. Just like the tom mics, Julian pulls the mic away slightly to allow breadth and air rather than attempting close proximity.
Underneath the snare is another Neumann KM184, which depending on the drumming style and song, Julian may blend with the SM57 to capture more rattle and snap.
Much of our microphone placement and selection here comes down to stylistic decisions and listening for what works in context with the overall song.
For some tracks, Julian might leave the bottom snare out entirely. The same goes for his sub-kick, and of course, the earlier mentioned central overhead.