Subscribe
Gear Reviews

Oeksound Soothe 2 & Spiff Review

I’d heard of Oeksound’s Soothe plugin but had never actually got around to using it, so I’m heading into this review without any preconceptions about the company or its products. What I can tell you is Oeksound is a cool young brand which was launched in 2016 with their first and, until more recently, only product, Soothe.

Now there is Soothe 2 and Spiff. Isn’t it refreshing - if a little daunting - to see a plugin or in this case two plugins that are not based on or emulating an existing piece of analogue or digital equipment? In other words, I might have to refer to a manual to find out how to use these two. So let’s dive in and see what they do and how they can help you.

Oeksound’s Soothe has taken on somewhat of a legendary status with engineer friends of mine immediately commenting on my ‘luck’ at being given the opportunity to review this plugin: “Where have you been for the last two years, Rick? I use this all the time!” one friend said to me.

“You’ll love Soothe, it’ll save you a ton of time and head scratching,” another said! So armed with the knowledge that the first incarnation of Soothe was a big hit in a subdued way, I downloaded both the latest version, Soothe 2, as well as a plugin I know nothing about called Spiff and entered the licence codes into my iLok account.

I have a couple of friends who I collaborate with who I share song ideas and demos, which are just that - ideas which have been quickly committed to computer in the case of one they are recording vocals via GarageBand with a Shure SM58; and in another, something similar. This gave me a great place to start and see if I could smooth out what are in some cases excellent performances, just not great recordings.

Smoothe Operator

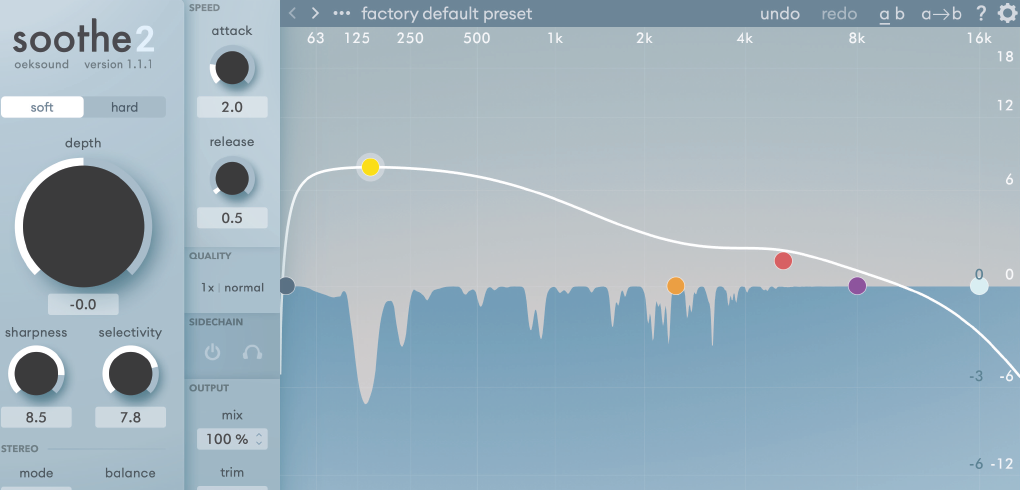
First off, just a word about the interface, which in itself is very soothing. It’s like looking at the horizon where the sea meets the sky. I’m not joking, I felt immediately relaxed as if all my woes were about to dissipate into the ether. Not relevant to the sound, I know, but a very effective and classy looking interface. And on second glance it looks like a cross between a parametric EQ and a compressor. But there is a twist... More on that shortly.

One of my tricks for hearing what plugins do before I actually apply them to any scenario is to pick a piece of music I know well and have a listen to what it does over a full frequency range. In this case I chose Steely Dan's Jack of Speed and Marcus Miller’s La Villette. There’s a large dial on the left which says ‘Depth’ on it just below two check boxes that state ‘Soft’ or ‘Hard’ [algorithms] and give you the option of one or the other. Soft is very subtle - I think the depth was half way up the first time I wound it in before I really noticed how it was affecting the audio. The hard setting on the other hand is less subtle and ranges from useful to crush the life out of!

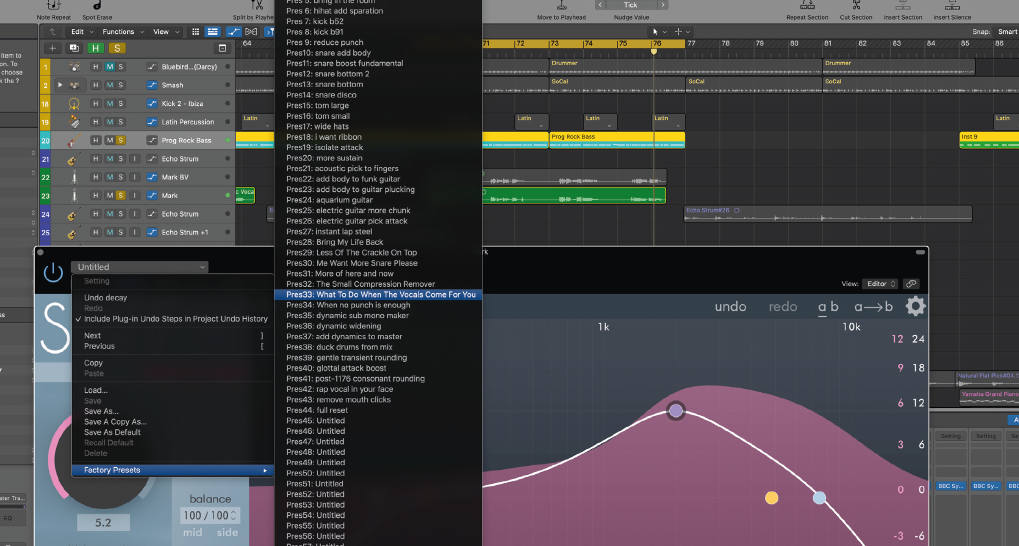
If you’re not familiar with Soothe like myself, a very good place to start playing is the user presets, giving you a bunch of options with which you can quickly get a feel for how Soothe works, sounds, and how it could come to your aid when particular issues become apparent.

Fine Tuning

To really put this plugin to work you have to refer to the right side. This gives you four bands of control, not unlike a parametric EQ in reverse. As you make adjustments to your band controls and move the curve upward, you increase the amount of processing or reduction of resonances within that frequency band, so it’s very easy to understand.

I think for the first time I was actually listening to just transient information...

When you first play something through Soothe 2 there’s an instant graphical representation in the lower half of the screen - the sea, as I like to call it - which remains there even when you hit the bypass button at the bottom of the second column of controls, which provides latency-compensated and click-free operation in preference to the plugin on/off button at the top left.

Not all resonance is simple to find as it’s often made up of harmonics and overtones that could manifest themselves in various parts of the spectrum, so having a graphical representation of the audio going through the plugin before you start to affect it can be very useful in guiding you where to look. In each of the four bands as well as the High and Low Cut options you have the ability to bypass them individually and collectively to give you a clearer visual picture of what’s going on; and a ‘listen’ icon allows you to hear what’s going on in each range.

Very useful as well is that the sea turns grey when in bypass mode; you might think I’m stating the obvious here but there are so many fine adjustments that can be made to solve whatever problem you are chasing which may be subtle and might not be constant, so it’s important to know at a glance whether Soothe 2 is processing or in bypass mode. You will find yourself regularly flipping bypass in and out to check your work!

The delta button just above the bypass is also an extremely useful feature which allows you to hear what the processing is taking away. This is also great for highlighting and targeting those particular resonances that cause concern, discomfort, or both!

On the lower section of the left control panel is the sharpness, which controls how narrow or wide Soothe 2’s individual EQ cuts are; and selectivity, which reflects how rigidly it selects frequencies within the bands you have boosted for processing.

In the second column are controls for attack and release which are very useful for maintaining the attack of the original signal while then going to work on the resonance of, for example, a snare drum or a tom fill. I also found this useful on vocals for maintaining detail in articulation
while using it on particular voices.

Far Too Useful

I found myself editing a podcast and immediately reaching for Soothe 2 to help solve a problem with a voice recorded over the telephone - and yes, it helped. And so did Spiff, which we’ll get onto in a little while. Box ambience on an upright piano; room reflections on a home demo vocal; unusual injury-related resonance on an old classical guitar. Not all of these I’ve tried yet, but I keep remembering things I’ve done that I had trouble with at the time and wondering how much quicker my workflow might have been if I’d had Soothe 2 at my disposal. One very relevant fact to come out of this review is how much processing I was taking off in favour of this plugin. On more than one occasion I turned off a standard compressor, a multiband compressor, a de-esser and an EQ. Not all the time - but enough to make you think, certainly.

soothe 2 might just check the ways I look at processing vocals. For more advice on how to mix vocals, check out guides on vocal compression, EQ for vocals, and De-essers respectively.

So Soothe 2 is a plugin you can almost load and leave with the minimal amount of faff, and it just works. Some problems take a little more solving, but I’d put Soothe 2 firmly at the top of my problem-solver category.

Spiff

Spiff on the other hand is described by Oeksound as a transient control tool: “Spiff analyses the incoming signal and applies processing only on the parts of the signal that contain the transient information. This keeps the rest of the signal intact and free from side effects.”

So you could look at Spiff as both a creative tool and possibly a problem solver. Now there are other transient control and manipulation tools out there: Sonnox Oxford Evolution and Waves Smack Attack spring to mind. So how does Spiff stack up against the competition?

Spiff features a similar style of interface to Soothe 2, so it was pretty easy to start playing with the minute I opened it, and it was really good to see some familiar controls which make these Oeksound plugins so user friendly. The Delta button was the first thing I was drawn to and you can’t really get a better transient test than a straightforward drum track! I think possibly for the first time I was actually listening to just transient information.

It has been my belief on occasion with some transient designers that I could just be listening to a very fast gate. Not in this case; the transients were clearly evident and audible, but in isolation. In some cases it would be a little difficult to actually know what the source track was; it’s only when you switch out of Delta listening that you hear how it has faithfully captured just the transients.

Spiff also features a whole host of user presets. In many cases they just worked and saved me having to refer to the manual as the changes on the interface gave away exactly what the presets had set up. These are really well crafted and will save you a lot of time when you’re first familiarising yourself with what Spiff can do. In most cases these presets are a very good place to start, but as with all good tools, they are made to be used, so an overview is in order.