Subscribe
Home Recording

10 Tips for Recording Vocals - Instantly Improve Your Production

Vocals are the most important part of a track for most popular music styles. Get it right, and you could have a hit on your hands; get it wrong on the other hand, and the entire song could fall short of the mark.

Thankfully, recording vocals doesn't have to be complicated. Even the most rudimentary setups or basic recording environments can yield professional results when you apply just a few basic ground rules.

For the full lowdown, we recommend checking out our complete how to record vocals guide, but in the meantime, keep scrolling for some fast-track tips that'll have you singing from the rooftops.


1 - Create a Relaxed Atmosphere

Recording studios are often quite stiff and clinical environments, so anything you can do to make the vocalist feel at ease will go a long way.

Provide comfortable seating and consider the basics, such as refreshments. Herbal tea is a great vocal relaxer and it's best to avoid anything that might irritate the throat, such as lots of caffeine, alcohol, or even very cold water.

It might sound a bit hippie trippy, but relaxed lighting (possibly even candles) can help create the perfect creative environment. Strong scented candles should be avoided, of course, as they might affect nasal passages when recording vocals.


2 - Always Warm Up

Are you feeling suitably zen? Great! Closely related to creating the right atmosphere is the essential process of vocal warm-ups.

Jumping straight into a vocal recording session without performing some basic warm-up rituals is unlikely to yield a good recording, and could even lead to vocal damage.

At the very least, a few basic 'ah' sounds and lip trills will elevate your performance compared with jumping in cold. If you're unsure where to start, try searching YouTube for the basics on warming up before recording vocals. As I always say, doing something is invariably better than nothing.


3 - Run a Practice Session (But Secretly Record it)

Part and parcel with making the vocalist comfortable is allowing the performer time to ease into your recording session. One of the best tips for recording vocals is to put them at ease; allow them time to adjust and take in the environment.

Start with a few practice sessions, but be sure to record them (just in case). I've lost track of the amount of great takes I've lost because we didn't capture the initial recordings. At the end of the day, you can always comp the performance (which means compiling the best bits of multiple takes), so you might as well capture it all.


4 - Do The Best You Can With Acoustics First

The way your room sounds will significantly affect the recording and how easy it'll be to fit the vocal in your final mix.

Unless you're blessed with a particularly nice-sounding acoustic environment that compliments your recording style, it often makes more sense to greatly control and reduce reflections.

It's easy to add space later using reverb but incredibly difficult, if not virtually impossible, to remove bad-sounding reverberations after the recording is complete.

Purpose-built reflection filters that attach to your mic stand can make a huge difference here. Also, it's worth experimenting with hanging a duvet behind the performer if the room is particularly bad; it doesn't look pretty, but it can make a big difference when recording on a budget.


5 - Consider Using a Dynamic Mic Instead of a Condenser

When we think of professional studio vocals, we tend to immediately associate the process with plush-sounding condenser microphones, such as the iconic Neumann U87 (for example).

Undoubtedly, condenser microphones are capable of capturing more subtle nuances and detail in a vocal performance. The downside, however, is their incredible sensitivity also makes them very good at capturing every little reflection in the room, and even the dog barking outside.

You'd be surprised how many classic vocals are recording with a dynamic mic; the Shure SM7b is perhaps the most notable example. Dynamic mics have the distinct advantage of being much less sensitive than condensers, so your recording environment's acoustics become less problematic.

6 - Use a Pop Shield

If you haven't already got a pop shield in your recording gear arsenal, it's about time you got one!

If you thought bad acoustics were challenging to deal with in the mix, that's nothing compared to the irritating issue of plosives.

It is virtually impossible to remove explosive consonant sounds once they're recorded. Get it right on the way in and avoid the vast majority of these by adding this very simple addition to your mic stand setup.

7 - Microphone Technique for Avoiding Sibilance

Aggressive high frequency 's' or 't' sounds (known as sibilance), can be extremely irritating to the listener. Specialist compressors – referred to as de-essers - are a great way to control or suppress pesky sibilance, but like all recording practice, it's best to get a solid initial recording and avoid taking the attitude of simply 'fixing it in the mix'.

If you notice sibilance causing an issue, you can often mitigate the problem by adjusting the mic placement. Try moving the microphone just above or below the singer's mouth or going slightly off-axis to roll off a degree of high frequencies.

The problem may still persist. In this case, it's a good idea to experiment with different microphones until you land on a solution that suits the performer's vocal style and delivery.


8 - Add a little reverb to the monitor mix

When tracking, it can boost a singer's confidence (and ultimately, performance) when you add a little reverb to their monitor mix.

Think of it like singing in the shower. All those lovely reflective surfaces just seem to enhance the feeling of singing out loud. Not only that, but it often helps with staying in tune, as the performer can more easily hear their own performance.

In addition, make sure the vocalist has an appropriate balance of their own direct sound and the song in their monitor mix. Taking time to balance their monitors can save hours of re-takes in the long run.


9 - Record Multiple Takes & Learn How to Comp in Your Daw

Most modern DAW packages make this easy. In Logic, for example, you can loop a particular section of your track and record as many takes as you like. Once you're sure you're ready to mix, you can simply swipe the best bits from each take to compile a "super take" that sounds like it was recorded in one.

Fans of pitch-perfect, modern 'auto-tuned' vocals might disagree, but I actually prefer this approach to automatically reaching for pitch correction vocal plugins. Naturally, it depends on the style of music, but there's something to be said for leaving a degree of human error in music.

Check out our previous article for the best plugins we recommend for vocals - including pitch correction options.

10 - Check Your Gain Staging

Gain staging, which is the process of managing the level of an audio signal over multiple steps, has lost some degree of importance when recording entirely in the box.

Getting a good initial recording signal on the way in, though, is still very important.

We want to make sure we're getting a strong signal that takes advantage of the resolution modern digital recording systems offer while also leaving plenty of headroom.

Analogue and digital systems use different decibel scales of measurement:

In the analogue world, we use dBu, which stands for decibels unloaded.

Digital systems use dBFS, which stands for decibels full scale.

In the good old days (or bad - depending on how you look at it) a good rule of thumb was to aim for 0dBu on the input of each step in the signal chain.

This would result in a strong signal that was kept well away from the analogue noise floor but didn't result in excessive distortion.

0dBu in the analogue world equates to roughly -18 dBFS in the digital realm. A good safe starting point when recording into your DAW is to keep each analogue stage hovering around 0dBu (if applicable) and aim for around -18 dBFS in the DAW.

Gain staging deserves a complete article in its own right, but in essence, make sure you record at a healthy level that avoids any potential noise floor, makes the best of your digital resolution, and allows plenty of headroom before distortion.=

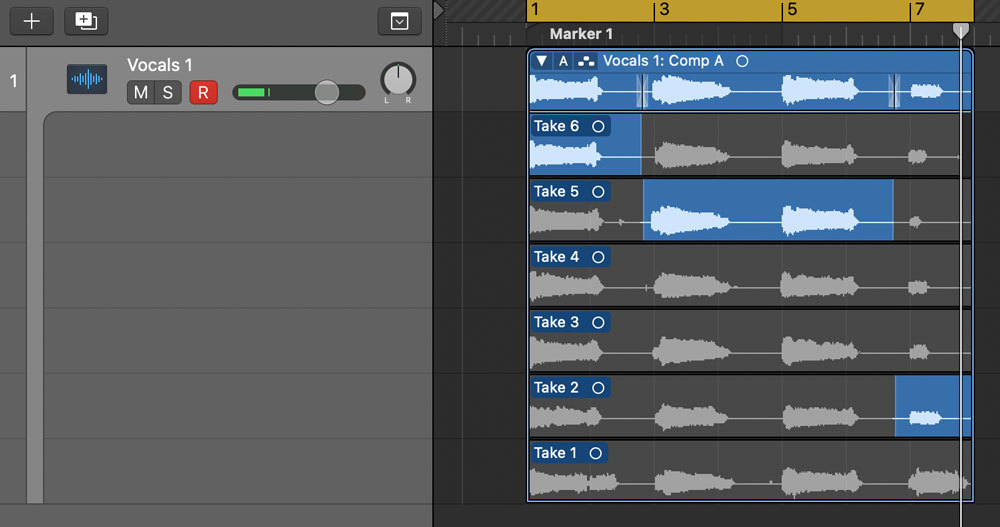
When recording vocals, test your input signal at the loadest point of the track to ensure you have enough headroom to cope with these critical sections.


How to Record Better Vocals - Summing Up:

One of the best tips for recording vocals at home is to set your studio up so the technology doesn't get in the way.

The tips provided in this article are solid advice for anyone getting started, but perhaps above all this is the importance of remaining creative.

Don't get too bogged down in the technical details. How the vocal actually sounds in context with the rest of your music matters above all else. Sit back occasionally, forget the technology (perhaps even close your eyes) and ask yourself if it sounds good. It's easy to fall into the trap of mixing or recording with your eyes rather than your ears.

Putting all technology and technique aside, it's the music that matters most.