


When you first start out in music production, the entire process can seem overwhelming. There are just so many plugins and software options available.
In fact, your DAW (digital audio workstation) likely comes with countless plugins, right out of the box as standard. On top of this, there are several premium plugin bundles and countless free plugins also available to download and enhance your production capabilities.
But what plugins do you actually need to compile your first mix?
Thankfully, to polish off the basics of your first mix, you don't need as many plugins as you might think.
With a good core recording and a well-thought-out composition, it's entirely possible to get the vast majority of your mix together by understanding just three core plugins types:
- EQ
- Compression
- Reverb
Does that mean the countless other plugins, from delays to stereo-widening plugins or even modulation effects, such as chorus or phasers, are completely pointless?
Of course not. However, when first starting out, if you can develop a solid understanding of the fundamentals, then everything else you apply beyond this point will have a more significant impact.
What Makes A Great Mix?
There is no one-size-fits-all approach to mixing, but a good place to start is to ask what we're actually trying to achieve when mixing a track.
The relationship between each musical element and its appropriate position in a mix will depend greatly on the genre of music and a degree of personal taste.
In general, we're trying to achieve a cohesive, balanced result where each element occupies its own space but still gels and belongs to the overall mix as a greater whole.
The good news is, besides the basics of level control and panning, most of this process is entirely achievable using only EQ, compression, and reverb.
If we can think of a mix visually in terms of space, it becomes easier to understand how balance and clarity are achieved. One of the best examples of this I've ever seen is in David Gibson's book 'The Art of Mixing: A Visual Guide to Recording, Engineering, and Production'.
The book was originally published in 1997, but it still remains one of the best examples of how to think of a mix visually. It teaches you to think of a stereo mix as a 3D visual field (as pictured below).
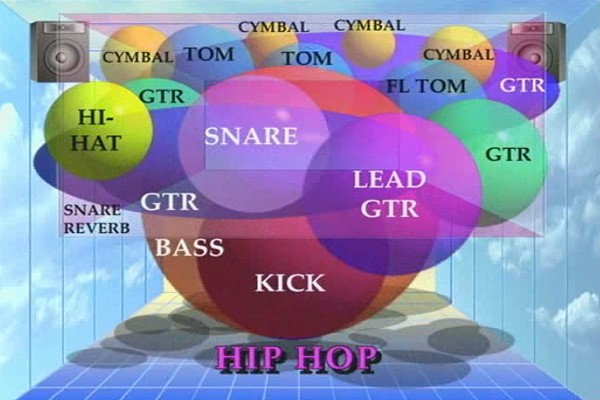
Using only volume levels, panning, EQ, reverb and compression, we can place each element in our mix as though we were looking at a 3-dimensional stage.
Only the EQ, reverb and compression are applied as plugins on individual tracks, groups, or the master bus. Levels and panning are applied using the mixer in your DAW.
The premise of this article is to establish what plugins you need for mixing, and so for the remainder, I will simply explain how each of these tools work to build the foundation of a mix.
The exact settings you apply should be determined by what your individual track requires. However, understanding what they do and how they work will help you make better mixing decisions.
Volume Levels
Adjusting volume levels is the most basic way to start balancing each component of your track. By increasing or decreasing levels, we can pull elements to the front or push them further back.
In our 3D mix field, we're essentially starting to push further away, or pull them in closer. There are many other aspects that affect how close or far away an instrument sounds (such as reverb and EQ—more on this later), but this is the primary and fundamental component of distance in a mix.
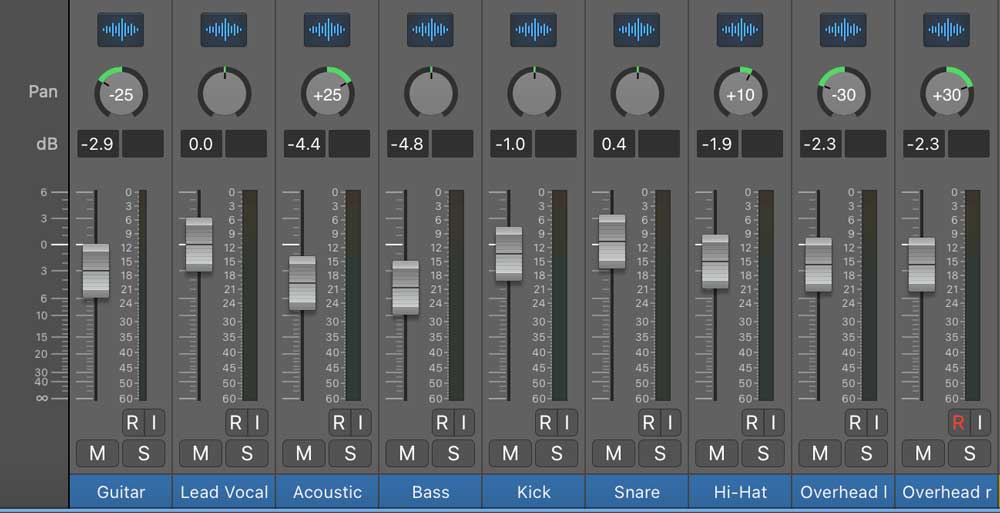
Panning
In a stereo mix, panning enables us to build a perception of space within a stereo field. We can bias instruments more to the left or right speaker and make them appear to come more from the left or the right. Leaving the pan-pot dead center will keep the signal amount equal in both speakers and give the impression of coming from the middle of our stereo field.
You can think of this like positioning instruments on a stage. Usually, when you see a band live, for example, the drummer sits in the middle of the stage (as does the vocalist).
It's rare for either the drums or lead vocal to be panned far over to the left or right of the mix. Not only does this sound quite unnatural (particularly on headphones), but it can also throw the weight of a mix off with a lot of bass energy defaulting to one side of the mix.
There are, of course, exceptions. In the 1960s, during the early days of stereo, it was often commonplace to hear such extremes as the drums panned hard left or right and the instruments panned hard to the opposite side. Alternatively, mix engineers would play with panning instruments from one side of the stereo field to the other during mixdown for effect. Like any new technology, there's usually an element of novelty-factor that sees it pushed to the extremes at first.
Nowadays, producers and engineers tend to use stereo in a more balanced way to achieve a sense of space and width without causing the overall bigger picture to sound lob-side.
With the recent trend towards incorporating Dolby Atmos Surround technology into recorded music, we can now take this one step further and bring surround sound to music, even when listening on a standard set of stereo headphones.
This might sound impossible, but it works by emulating a binaural record to give the impression sounds are coming to our ears within a 3D space.
EQ
Now comes the first plugin we need for mixing: EQ.
EQ plugins allow us to manipulate the frequency content of our recording, and help all the track elements work together sonically as a complete picture.
We can boost certain frequencies to help enhance them or cut through a mix and reduce other frequencies to avoid conflict. In more extreme cases, we can deliberately 'notch out' unwanted resonances in what we refer to as 'remedial EQ'.
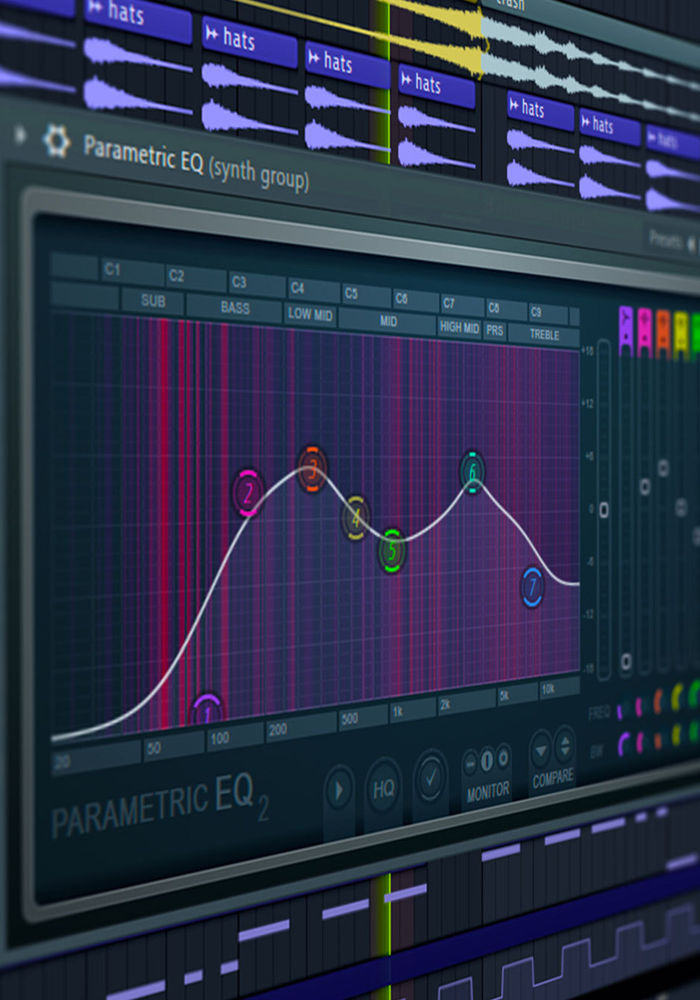
Pictured below is a typical channel EQ found in most DAW packages. It has four main notch filters we can use to boost or cut select frequency ranges, plus a low and high-frequency shelf. There's also an additional pair of low and high-pass filters.
Using a very simple visual interface, we can easily swipe each band to change the affected frequency and drag up and down to change by how many dB we cut or boost. The 'Q' parameter allows us to narrow the affected frequency range and either apply broad changes or narrow down to a very specific frequency.
EQ - Think of the Bigger Picture
While we can spend a long time applying EQ to individual tracks so they sound good in isolation, this doesn't mean the result will sound good when combined with the broader elements of your mix.
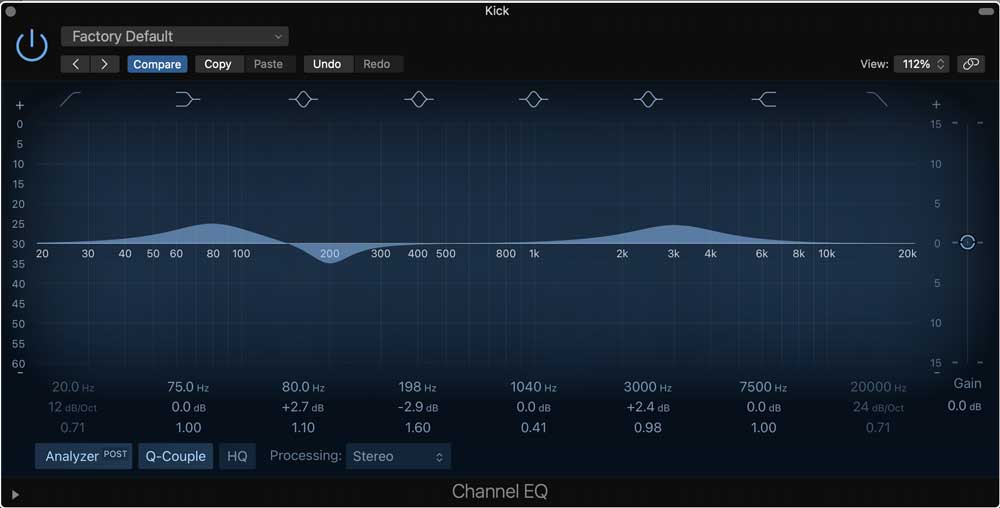
A good example here is the kick drum and bass guitar. Both of these tracks take up a lot of energy in the low-frequencies, which contain a lot of energy and can quickly combine to make a very 'muddy' or cluttered-sounding mix. In many cases, excessive low-end can also kill headroom in your mix.
When EQ'ing the kick drum and bass, you want both elements to work together rather than competing for the same space. For example, if you try boosting the kick at 80Hz and find this adds the desired 'thud' required for your track, it often makes sense to cut the bass at this same frequency to allow the kick space to breathe. The same often applies vice versa to the bass.
Listen to the pair in context and apply boosts and cuts to the low-frequencies until you feel each part occupies its own space in the frequency range, and the two tracks work together in tandem.
This is just one example of how to apply EQ in a way that shapes individual track elements to occupy an appropriate space within the frequency spectrum. The most important takeaway here is to remember the bigger picture. In other words, what sounds good in isolation, might not necessarily be right in the context of your overall mix.
Compression
Audio compression can make or break a mix. If applied correctly, it serves as a vital tool in controlling dynamics or shaping the sonic sound of our recordings. When applied badly, it can sonically destroy a recording, or simply render it void of dynamics and excitement.
The good news is, compression doesn't have to be complicated. You need to understand just a few parameters, and you'll soon be applying compression in a complementary way to enhance individual tracks.
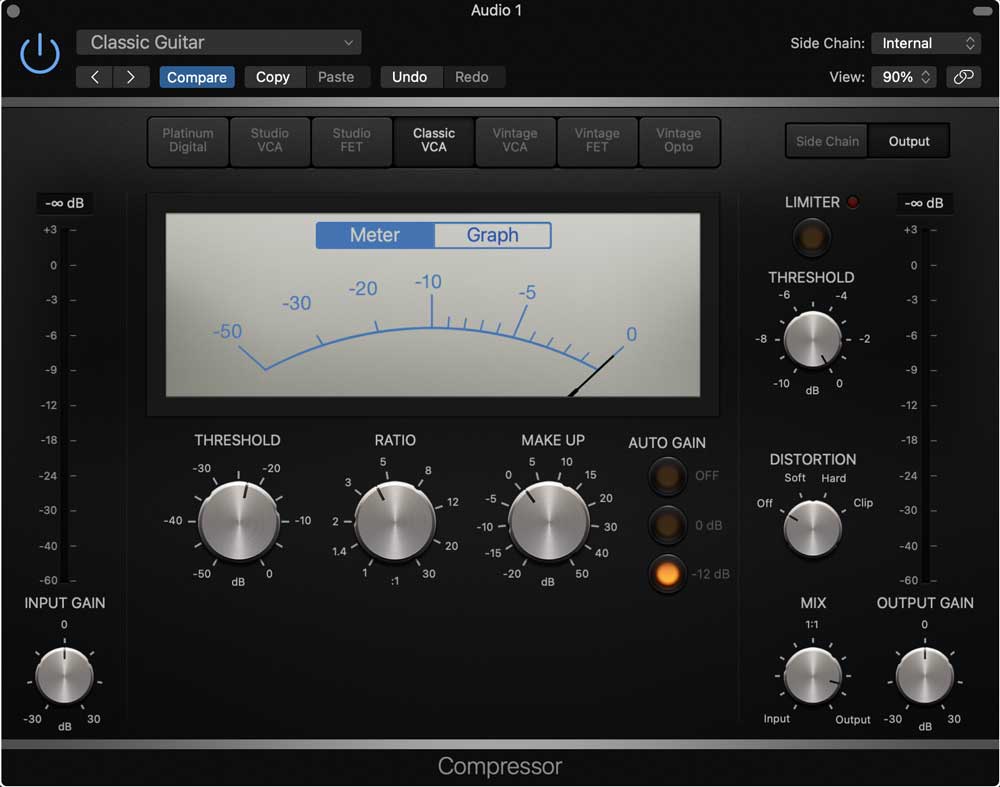
What Does a Compressor Do?
In very simple terms, compressors reduce a sound's dynamic range; they make the louder and quieter parts of the performance closer to each other in level.
In order to do this effectively, we need to understand the core controls. Get a basic understanding of what the threshold, ratio, attack, release and gain controls do, and you'll be a master of dynamics before you know it.
Threshold
The threshold setting is the point at which dynamic processing is applied. It sets the level (in dB) above which the compressor acts on the incoming signal.
Ratio
Ratio changes how much compression is applied when the signal exceeds our threshold. In other words, by how much does the plugin reduce the signal after exceeding the threshold.
For example, expressed in decibels (dB), a ratio of 2:1 means for every 2 dB the signal goes over the threshold, we reduce it by 1 dB.
Therefore, a signal exceeding the threshold by 2 dB will be reduced down to 1 dB above the threshold. At the same setting of 2:1, a signal exceeding the threshold by 8 dB will be attenuated down to 4 dB above the threshold.
Higher ratios result in more attenuation and less dynamic range. Ratio settings of 3:1 - 4:1 are considered by most to be moderate compression.
5:1 - 7:1 results in medium compression and anything above 8:1 gets into the realm of strong compression.
Anything above 20:1 starts to get toward what we consider as limiting rather than compression.
Attack
The attack setting affects how quickly the compression is applied, or in essence, how long does it take for the signal to be fully compressed.
Release
As you can guess, release is the other side of the coin and affects how long it takes for the compressor to stop compression.
Gain
Output gain or 'make up gain' simply allows us to make up for the signal attenuation with additional volume after compression is applied.
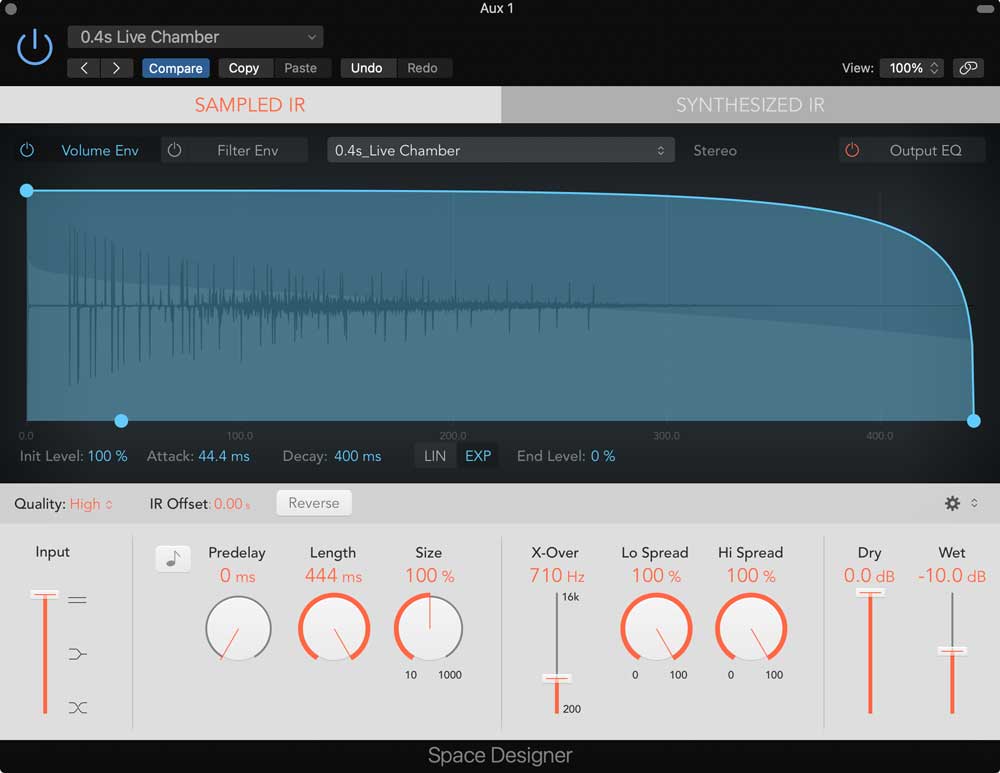
Reverb
So far, we've created a sense of balance and separation in our mix; what's missing at this point is a sense of real space.
Many modern recordings are captured in environments that contain very little in the way of natural reverberation. Therefore, they can sound quite dry and lifeless until we apply reverb as a plugin.
In addition, if our composition contains a mix of virtual instruments and real instruments recorded with microphones, then many of our components will have almost no sense of space whatsoever.
The challenge here is to make the entire mix sound like it was recorded collectively in the same environment - regardless of how the source was recorded or composed.
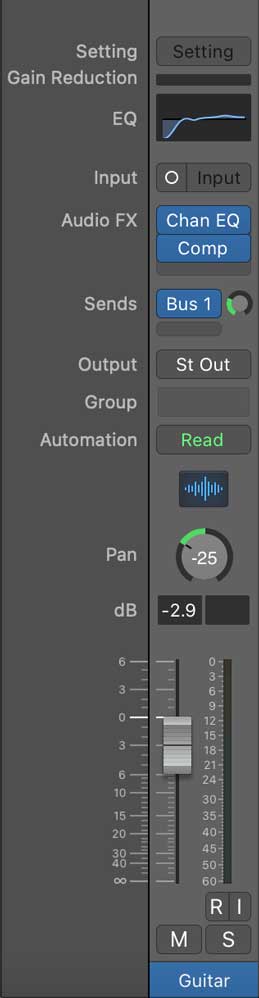
We can achieve a sense of space across our entire mix very quickly by placing a reverb plugin on an Aux channel. With the plugin inserted on the Aux channel, we can then send a portion of each channel to the reverb using Aux sends on each individual track.
The more signal we send to a reverb channel, the 'wetter' it will sound. If we pull down the fader on a track, but send a strong signal to the Aux reverb channel, it gives the impression of an instrument sounding further away.
On the other hand, drier signals with less reverb and more direct fader volume will sound closer and more intimate.
The reverb we apply across the mix is usually a type of room emulation, varying from small spaces to large concert halls depending on the desired effect.
Applying Reverb as an Effect
While reverb can give the sense our entire mix belongs to a single recording environment, there are also plenty of examples where spot effect reverbs help add character to individual sources.
For example, it's often customary for a guitar to have 'spring reverb' as a vintage effect. Or, we may want to add impact to a snare drum by adding an additional 'plate reverb'.
To add these spot effects, we can set up another Aux track and send via another Aux send where desired.
Wrapping Up: What Plugins Do I Need for Mixing?
If you're new to mixing, it's difficult to know where to start.
After all, you can ask ten people how to mix a track and get ten completely different answers.
Also, a well-recorded track capture in a great sounding room with appropriate microphone technique will invariably be easier to mix than a track recorded in less-than-ideal conditions.
The purpose of this article is not to tell you how to mix, but simply to introduce some of the fundamentals.
There's no point having access to every plugin under the sun if you can't load up a compressor and understand what each control actually does, for example.
Once you grasp the basics of balance, separate, dynamic control and space you'll be able to delve deeper into more advanced mixing techniques.
Mixing is also about developing your ear. Over time, you'll get a better sense of what sounds good, and what doesn't. It pays to have a reference track from an engineer whose work you like on hand to check your mix against a real-world, commercial release.
Also, most home producers aren't necessarily blessed with the optimum setup and environment to mix as accurately as a professional recording engineer. Therefore, regularly checking your mix on a wide variety of systems is imperative.
Test your track in the car, on basic earbuds, through your home HiFi, and even basic laptop speakers. A great commercial mix needs to translate well on a variety of different systems, so the wider you can cast your net, so to speak, the more likely you'll have a mix that sounds good across a range of listening systems and environments.
As your confidence grows, you can invest in premium plugin bundles to improve the quality of your tools. Just as a musician slowly upgrades their instrument as they learn and grow, the same applies to mix engineers. Getting started, though, you don't need many plugins at all, and regardless of which DAW you choose - be it Logic, Pro Tools, Cubase, or any other platform, they all come equipped with the basic plugins detailed on this page.